RXC52-A3G & TP Instruction Manual

Thank you for choosing MXO-RACING brand products, please read this document carefully before use!
The RXC52-A3G&TP is a miniature antennaless version surface receiver that integrates both Transponder and Mul_Gyro.
The RXC52-A3G&TP is a miniature high-speed surface receiver. It is compatible with the FLYSKY AFHDS-3A protocol and is suitable for 1:24/1:28 or MINIZ models.
With its compact size and reliable performance, the RXC52-A3&TP is the perfect choice for hobbyists and enthusiasts looking for a high-quality surface receiver for their mini-rc car projects using NB4 transmitter.
Features:
Size:19.6*12.0*7.0 mm;
Weight: 1.35g;
Working voltage: 3.3~8.5V;
Compatible with the FLYSKY AFHDS-3A protocol;
Transponder with built-in editable personal ID number;
Personal ID range: 1~16777215;
Parallel high-speed output;
Support 2.63ms high-speed output;
Built-in Mul_Gyro;
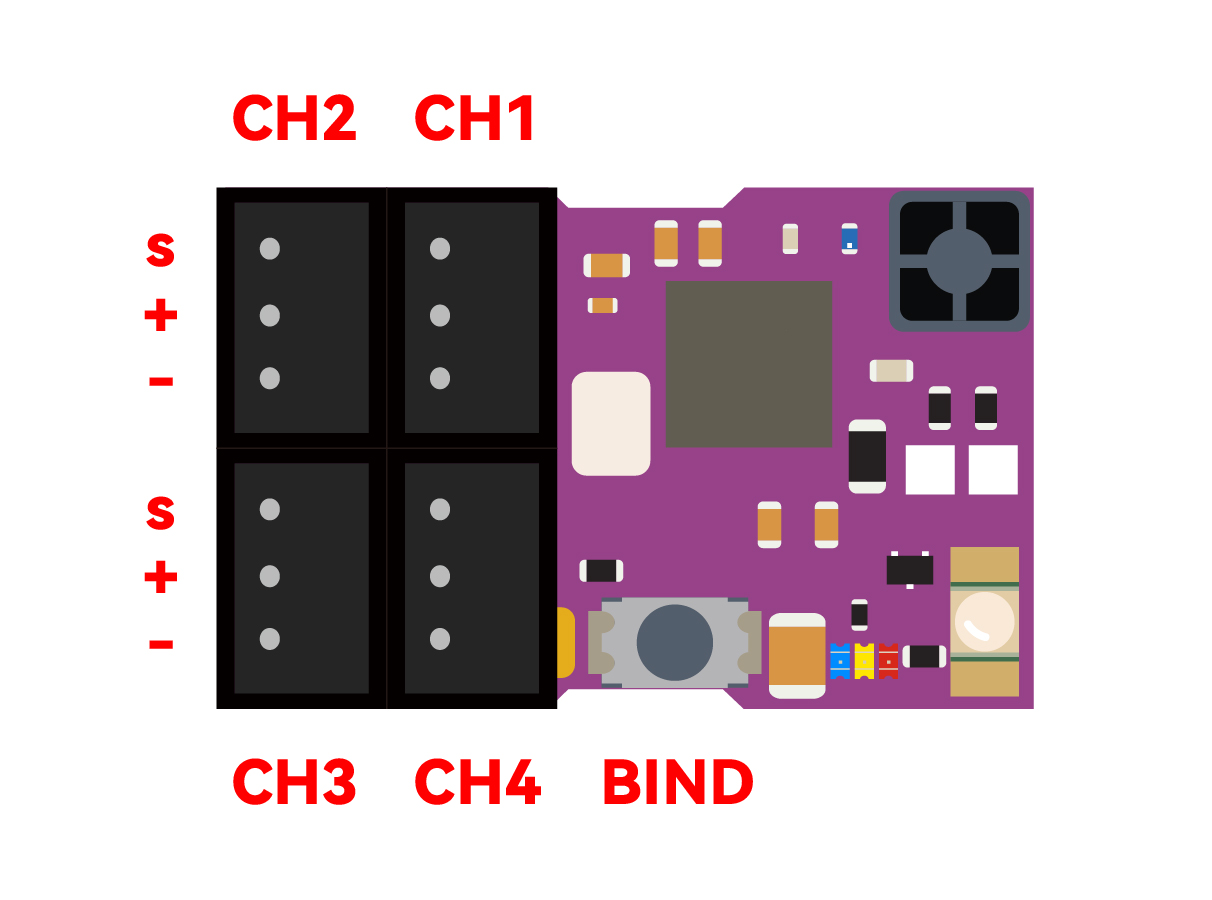
Interface (Figure 1):

LED Function:
Blue LED is used to indicate the receiver operating status:
The blue LED flashes quickly to indicate that the receiver is in the connected state;
The blue LED flashes at a low speed to indicate that the receiver is waiting for a signal from the transmitter;
The blue LED is solid to indicate that the receiver has received the transmitter's signal and is working normally;
Yellow LED is used to indicate the working status of the gyro:
The yellow LED off indicates that the gyro is off or no gyroscope;
The yellow LED is solid to indicate that the gyro is working, where low brightness means that the working direction of the gyro is NOR, and when the high brightness indicates that the working direction of the gyro is REV;
Red LEDs indicate Transponder operating status:
The red LED off indicates Transponder off or no Transponder;
The red LED is solid to indicate that Transponder is working;
BIND Operation:
First press the BIND switch, and then power on the receiver, when the blue LED flashes rapidly, it means that the receiver is in BIND mode, at this time the BIND switch can be released. Then perform the BIND operation according to the BIND method of the transmitter.
If the BIND keeps failing, please refer to the "How to upgrade NB4 RX firmware" document to upgrade the receiver firmware.
Set the built-in GYRO sensitivity and working direction:
RXC52-KG&TP uses the CH3 of the transmitter to set the sensitivity and direction of the GYRO.
When the CH3 signal is less than 1.4ms (Yellow LED High light), the direction of action of the GYRO is to the left, and at the same time, the smaller the width of the CH3 signal, the higher the sensitivity of the GYRO.
When the CH3 signal is greater than 1.6ms (Yellow LED is low light), the direction of action of the GYRO is to the right, the greater the width of the CH3 signal, the higher the sensitivity of the GYRO.
When the CH3 is in the middle, the GYRO will turn off, and the Yellow LED is off.
Set the End Point of the ST channel:
When using the built-in GYRO, the signal of the GYRO will be superimposed on ST. At this time, the output of ST is not limited by the End Point function of the transmitter. If the EXP is too large, the servo may be stuck. In order to prevent the above situation from happening, we have developed the End Point function on the receiver. The setting method is as follows:
1) First set CH3 on the transmitter to the midpoint to turn off the built-in GYRO, at this time the yellow LED is off;
2) Turn the ST channel of the transmitter to make the servo arm swing to the desired position on the left and hold, and then press the BIND switch. At this time, the yellow LED flashes for about 2 seconds and then off;
3) Turn the ST channel of the transmitter to make the servo arm swing to the desired position on the right and hold, then press the BIND switch, at this time the yellow LED flashes for about 2 seconds and then off;
4) After the above three steps, the left and right end points of the ST channel are set up. The position of the servo arm on the left and right in the second and third steps is the end of the ST channel.
Note: When the built-in GYRO is turned off, the End Point value of the ST channel comes from the End Point setting of the transmitter. When the built-in GYRO is turned on, the End Point value of the ST channel comes from the setting of the receiver.
When the above settings allow Gyro to meet your job requirements, you don't need to pay attention to the next section, when the above settings do not allow Gyro to meet your job requirements or you want more advanced Gyro features, then read the next section.
Set the parameters of the built-in Mul-Gyro items:
The built-in Mul-Gyro is a complex Gyro with up to 17 parameters to meet various operating conditions. In order to facilitate the user to set the parameters of Mul-Gyro, we provide a supporting GUI tool, as shown in the figure below (Figure 2).

The user needs to use the MX USB PG-ISP to connect the receiver and GUI, as shown in the figure below (Figure 3).

How to edit Transponder's personal ID number:
RXC52-SAG&TP have built-in Transponder, and users can edit their own personal ID according to their preferences, for which we provide visual personal ID Editing tools as shown in the following figure (Figure 4).

Before editing the personal ID number, the user needs to use the MX USB PG-ISP to connect the receiver and GUI, as shown in Figure 3.
GUI download connection: https://store.mxo-rc.com/download-gui
If you have any feedback or suggestions, please contact us, thank you!
Email: [email protected] & [email protected]


Leave a Reply Cancel Reply