
MX EVO RX-SFHSS Manual
![]()
Thank you for choosing the MXO-RACING products, please read this document carefully before using it!
The MX EVO RX-SFHSS is a FUTABA-SFHSS compatible ultra-miniature receiver for KYOSHO's MR-03EVO and MA-03EVO, with an output speed of up to 3.4ms in EVO mode. It can work not only in EVO mode, but also in 4CH PWM standard signal mode.
In addition, we are developing miniature sensor brushless ESCs and other related products that can be directly mounted on this receiver.
Features:
l Size: 13.5*10.0*3.5mm;
l Weight: 0.58g;
l Working voltage: 3.0V or 3.3V;
l Compatible with Futaba-SFHSS protocol;
l Support EVO and 4CH PWM two working modes;
l The output speed in EVO mode is 3.4ms;
l The output speed in 4CH PWM mode is 3.4/6.8ms;
l Support online firmware upgrade.
Bind Operation:
Install the MX EVO RX first, then power on the receiver and press the BIND switch until the red LED on the RX changes from slow flashing to fast flashing.
Power on the transmitter, then set it to SFHSS mode (if it is already in SFHSS mode, ignore this step), wait for a few seconds, when the LED on the receiver changes from fast flashing to steady light, it means BIND is successful and the receiver is already in normal mode .
Red LED status indication:
The red LED on the MX EVO RX is an indication of the working status of the RX:
1) When the red LED flashes slowly, it means that RX is waiting to receive a signal;
2) When the red LED flashes quickly, it means RX is in BIND mode;
3) When the red LED is always on, it means that the RX has received the signal stably.
Green LED status indication:
The green LED on the MX EVO RX is an indication of the RX operating mode:
1) When the green LED is on, it means the RX is working in EVO mode;
2) When the green LED is off, it means that the RX is working in 4CH PWM mode;
How to set up the transmitter (when MX EVO RX is used on MR-03EVO/MA-03EVO):
Because the brushless ESCs and servos on MR-03EVO/MA-03EVO cannot set the midpoint and end point, the user can only set the transmitter to adapt to the parameters of MR-03EVO/MA-03EVO. The settings are as follows:
1)TH TYPE > F5 : B5
2)EAP: ST > L150% R150%
TH > H150% B150%
3)D/R: ST > 100%
TH > 100%
Note: Points 2 and 3 can be adjusted according to user habits.
How the MX EVO RX works in EVO mode:
When users install MX EVO RX on KYOSHO's MR-03EVO/MA-03EVO frame or other products that support EVO mode, MX EVO RX will work in EVO mode.
In EVO mode, when the MX EVO RX is just powered on, the LED on the RX will not flash quickly, but the green LED will light up.
Note: When using the MX EVO RX on the MR-03EVO/MA-03EVO, be sure to install it in place, otherwise you may burn it; if necessary, place the receiver compartment cover on the MR-03EVO/ MA-03EVO Add a small piece of sponge to hold down the MX EVO RX.
How the MX EVO RX works in 4CH PWM mode:
When users install MX EVO RX on EVO-BA1 or other products that support 4CH PWM mode, MX EVO RX will work in 4CH PWM mode.
In 4CH PWM mode, when the MX EVO RX is just powered on, the LED on the RX will flash several times quickly and then enter the working mode, but the green LED will be off.
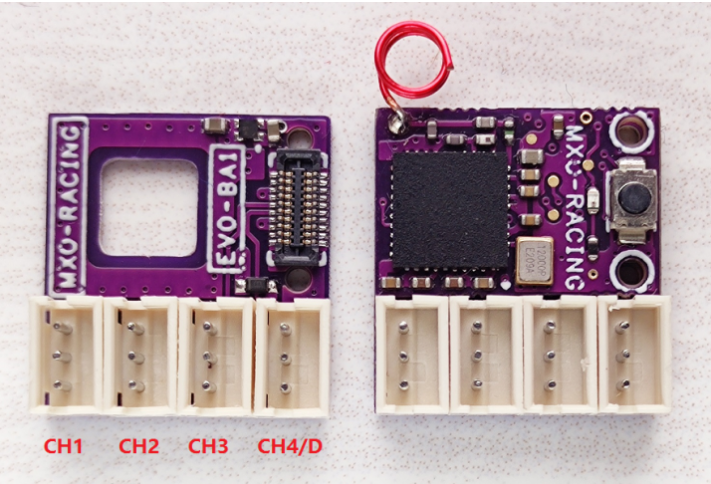
The picture below shows the EVO-BA1 on the left and the EVO-BA1 with the MX EVO RX installed on the right:
Online firmware upgrade:
This function requires GUI support on the PC side, and the receiver and GUI need to be connected through the MX USB-PG-ISP. The remote control must be turned off before the receiver is connected to the GUI, otherwise the receiver cannot be connected to the GUI.

Note: 1) The SW switch on the MX USB-PG-ISP must be moved to the "I" position;
2) When the GUI is connected to the MX EVO RX, the transmitter must be turned off, otherwise the GUI cannot correctly read the information of the MX EVO RX.
3) When the MX USB-PG-ISP is connected to KYOSHO's MINI-Z product, the cable needs to be replaced;
GUI download link: update.crossover-rx.com/mxo.zip
Please contact us if you have any feedback or suggestions, thank you!
Email: [email protected] & [email protected]
Leave a Reply Cancel Reply